


With Palm & Nokia 7110 connected to the internet
Introduction
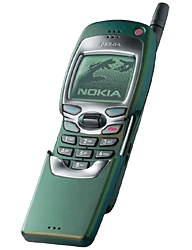
This page gives information on how to use the Nokia 7110
cellular phone together with a Palm III / IIIx / V by using an IrDA
connection using PalmOS 3.5. Using PalmOS 3.3 you will
see the same menus but with PalmOS 3.0 you will get very different
menus. At least PalmOS 3.3 is available for free so I see no reason
to discuss older versions.![]() Configuring the Palm
Configuring the Palm
Functions without additional software
First of all you will have to activate the Infrared menu on the Nokia 7110 (Menu 9). You will get a small flashing symbol in the upper left corner. An active connection is indicated by a solid symbol. To connect both units via infrared you have to place them eye to eye. The Nokia 7110 hereby lies with its antenna facing the Palm's upper edge. You should not place the units too close together as the infrared range is about 1 meter (3 ft).
Address
The transfer of single addresses works without any trouble. Even the type of the phone numbers are recognized and exchanged correctly between Palm and 7110. Also email addresses are exchanged correctly. Available notes are also supported but the length within the 7110 is limited and will be cut if too long. Beginning with firmware v4.77 mail addresses are also exchanged.
Calendar
The transfer of single dates works without any trouble. Even repeating entries and active alarms are correctly exchanged.
Other applications
The transfer of data from other applications doesn't work. Where should the 7110 store the data anyway?
Prefs Connection
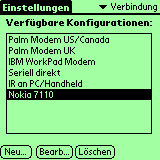 |
We start in Prefs and submenu Connection, click on New and create the configuration Nokia 7110 |
 |
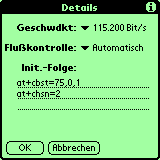
Now you enter the values shown in the left graphics into the appearing menu and click on Details. |
|
Into the appearing menue the values shown on the left hand have to be entered for maximum performance. The first init string activates V.110 and thus enables a faster connection establishment. The second one enables data transmission with 14.4 KBps and thus faster transfers. |
Prefs Network
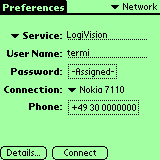 |
After the Connection has been configured we continue with configuring the Network preferences by opening Network in the Prefs menu. By clicking on a service we would never ever use we get a menu where we can change this service according to our needs. Under service we should enter the name of our ISP (Internet Service Provider). I bet you know your username and password?! In Connection we select the just defined Nokia 7110 and the field phone has to be filled with the phone number of your ISP. It might be the easiest thing to simply copy these settings from you normal browser or TCP/IP stack. If you're in doubt ask your ISP. |
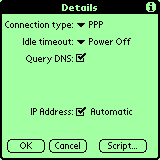 |
In Details the shown values are entered. The submenu Script is only
filled with End: on my system. In case of complicated authentification
procedures you should copy these from you normal browser or TCP/IP stack. This
procedure should read like this: Wait for Prompt Send ID Wait for Prompt Send PW End: |
Connecting
Cellular phone and Palm have to be placed with the IrDA ports facing each other within a range of 1 meter (3 ft) distance to establish a connection by ...
PALM : Prefs > Network > Connect
In case of problems (phone doesn't dial, connection can not be
established in spite of dialing) the prefs in the Palm should be checked.
- Has the password been entered correctly?
- Has the settings in Details been entered correctly?
- Does your ISP use caller id recognition?
- Is you cellular number in this case known to your ISP?
- Is this number transferred while calling?
- If using the German service of Vodafone-INet you have to enter something for username and password!
- Perhaps deactivate V.110 (delete ATB29)!
If it works we happily end the connection as a pure data connection is pretty boring without programs using it. These programs have already been mentioned above. Usually they build up the connection on their own and one just has to configure the service to be used.