Nokia 7110 - Enhancing with blue display illumination
Introduction
Welcome to the workshop. Before I tell how to modify a Nokia 7110 to have blue LEDs, shortly the disclaimer that the modification is on your own risk, the guarantee will surely be gone and querying for a firmware update in your Nokia Service Center from now on will just cause just an insane laugh from the shop assistant.
I have done the below described modification on my own and it was the smallest soldering I have done so far. The SMD LED's are only 1,2mm "big". If you are in doubt of your soldering abilities, drop it.
You will need the following material
- Solder max. 8W with fine tip
- About 0,5mm solder
- TORX screwdriver size 6
- Tweezers
- Generic hair dryer
- 4x SMD LEDs type 1206
- 6x SMD LEDs type 0805
Disassembly
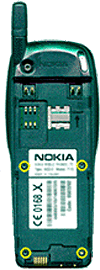
To take the phone apart first we take off the battery and the SIM. Then we unscrew the four TORX screws like visible on the upper left picture. Now we can take off the back. It is a little bit difficult at the infrared window but can be solved by moving it back and force a little.
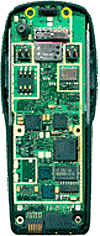
Now the layerboard's back side is right in front of us like visible in
the lower left picture. Here both TORX screws besides the infrared diodes have
to be unscrewed to get the parts visible below.
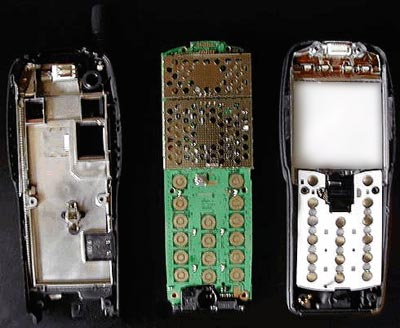
That's how the phone looks unscrewed. In the middle of the picture the
layerboard is visible with six white dots. These are the LEDs which are
unsoldered first. Please be careful not to harm the layerboard.
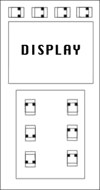
Now the new LEDs are soldered according to the graphics besides. It is important to solder the LEDs in the right direction. In the graphics black points are visible. The new LEDs (type 0805) are marked with a black dot on one side. The black points on the LEDs must correspond with the black dots in the graphics.
Until now it was rather easy but now the four LEDs for the display hit the game. To change them the display has to be removed first. This is the module in the right hand of the upper picture. To do that first close the key protection slider and lift and pull the diplay module to the upper part of the case.
On the upper edge between the two holes for the TORX screws one can see a plug which connects the display to the layerboard. This is fixed with a metal frame. This metal frame has to be lifted carefully with a small screwdriver. Now it gets real difficult.
The display module consists of a foil layerboard and a plastic frame for stabilization. Both are connected with dual layer glue tape. To part them I recommend warming it up with a hair dryer by aiming at the white foil on the back and then parting it with a flat knife. One has to place the knife between the white display reflection layer and the plastic frame (not between the plastic frame and the white foil on the back). By the same time one has to push both arms of the plastic frame together to loosen the barbs. Carefully lever with the knife to avoid the display glass to break or the reflection foil to be damaged.
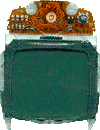
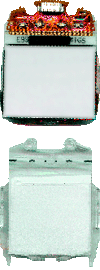
Afterwards on has the both parts shown in the right picture. On the display unit (left) one can see four LEDs now. These are unsoldered in the known manner and replaced by the new ones (type 1206). One has to be even more careful as a torn off contact on the foil layerboard gets pretty expensive. If you have not been careful you can find a link where to get new displays at the end of this page :-)
Now both parts of the display are reassembled and the plug fixed by the small metal frame. Then the display module is pushed back into the case. Now the layerboard is placed on top of it and fixed with the two TORX screws on the upper edge. Then one just has to fix the cases back panel with the remaining four TORX screws and it gets exciting. Insert the SIM, push the power button - and? Well, my 7110 is now blue and works great.


